Chickpea Flour (Besan) Soup

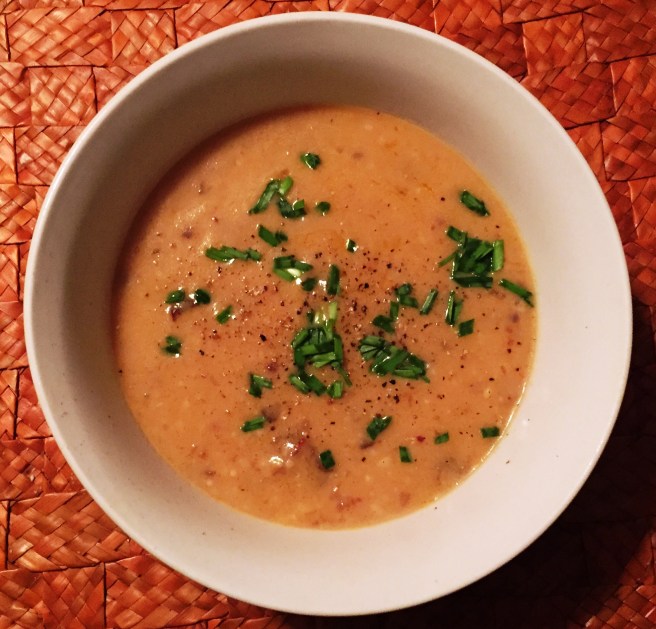
Although I was born in Argentina and carnivory runs deep through my veins, I love pulses (legumes) more with each passing day, due to their flavor, their versatility and their great potential for sustainable production.  I’m especially curious about chickpea flour (besan in India, shiro in Ethiopia) with its high-protein and low glycemic index awesomeness. Here’s a recipe, a variant of the one I found HERE (but which originally came from this exciting book):

Ingredients

For the broth

  • Water (or your favorite vegetable/chicken/meat/bone broth): 4 cups (use only 2 if using the chile ancho’s soaking water)
  • Garlic: 2 large cloves, peeled and chopped/sliced fine (no need to chop if using chile ancho and/or onion)
  • Olive oil, extra virgin: 1/4 cup
  • Cumin, ground: 2 teaspoons. Can also add a few cumin seeds.
  • Salt: 1 teaspoon
  • Optional: Onion, small, 1/2-1, cut coarsely.
  • Optional: Chile ancho, or other dried, colorful, not-too-hot pepper, rehydrated ahead of time (at least 30 minutes) in 2 cups of water. (Keep the water!)

For the besan

  • Water, cold, 2 cups
  • Chickpea flour / besan / shiro: 1 cup

For the finish

  • Green onion (scallion), thinly sliced: 1
  • Lemon juice: 2 lemons
  • Black pepper, to taste

Procedure

For the broth

  1. If you’re using the chile ancho, squeeze liquid back into the soaking water, split the pepper open, remove the seeds and stem, chop the pepper into a few pieces, put it in a food processor, and pulse a couple of times. You’ll want to use the soaking water as part of your 4 cups of broth, but remove the seeds first.
  2. If using onion, add to the food processor, along with the garlic. Pulse a few more times until the mix is still a little chunky. If you’re not using the chile ancho or the onion, just skip to step 3 and chop your garlic fine.
  3. Put about a tablespoon of the olive oil in a 3-quart saucepan over medium-low heat. When hot, sauté the garlic, onions, pepper and cumin for 2-5 minutes so the flavors are released. You don’t want any of it to burn, or your soup will taste bitter.
  4. Add the rest of the oil, the rest of the water / broth (including the chile soaking water if you used that, for a total of 4 cups) and the salt.
  5. Bring it to a boil over medium heat, while you move on to the next step.

For the besan

  1. Put the chickpea flour in a mixing bowl, then add about half the reserved cold water, mix/whisk, and keep adding the water until you have a smooth mixture.The idea here is simple: If you try to add the chickpea flour directly to the boiling broth, your soup will be irremediably lumpy, but you can get a smooth, lump-free mixture by combining the flour and cold water  mixture.
  2. After the broth in the saucepan has boiled for about a minute, whisk the flour mixture into it. Stir a few times while the mix reaches a boil again. It will thicken (to the consistency of heavy cream) after about 2-3 minutes of boiling.
  3. If your soup gets too thick for your liking, mix in a little more water.

  For the finish

  1. Stir in the lemon juice
  2. Ladle into bowls, and serve topped with the green onions and black pepper to taste.

For me, this recipe has huge potential: it’s very fast to prepare, filling and nutritious to boot. The challenge is to make the initial broth flavorful enough to be interesting. My use of the chile ancho (a dried ripe poblano pepper) is a move in that direction, because chile ancho provides interesting color and flavor without a lot of heat. The onions are another step in the same direction. You may want to explore other options like soaking kelp (kombu) or shiitake mushrooms in your water to add extra flavor, as well as starting with vegetable, chicken or bone broth instead of water.

20160830 Chickpea Flour Soup

Moth Beans

About 20 years ago I was exposed to crop simulation modeling. I was instantly hooked. Over the next few years I worked intensely on simulating the effect of water stress on peanuts and other legumes. I’ve remained a sucker for drought-tolerant pulses ever since.

I recently ran into moth beans (Vigna aconitifolia, pronounced “moad”) at a great Indian grocery store in St. Louis. I learned that they are highly drought-tolerant, and couldn’t resist the urge to buy some and cook them. I found several recipes online; what follows was taken from HERE, where there are step-by-step instructions with pictures.

The results are great: moth beans have a nutty flavor and a fun (rather firm) texture. It was interesting to sprout the beans ahead of cooking them. It took about a day and a half for mine to start sprouting (I bundled the soaked beans in cheesecloth and hung the bundle from the pot rack over our kitchen counter)

Ingredients

  • Moth beans (matki): ½ cup
  • Oil: 1 tablespoon
  • Cumin seeds: 1 teaspoon
  • Onion: ⅓ cup, chopped
  • Green chilies: 1, finely chopped
  • Tomato: ½ cup, chopped
  • Coriander powder: ½ teaspoon
  • Cumin powder: 1 teaspoon
  • Turmeric powder: ¼ teaspoon
  • Red chili powder: 1 teaspoon
  • Water: 1 ¼ cups
  • Lemon juice: 1 ½ teaspoons
  • Cilantro or coriander leaves: few, finely chopped

Procedure

  1. Wash the beans under running cold water until the water runs clear.
  2.  Soak the beans in water for at least 4 hours, preferably overnight. Discard the water and keep the drained beans aside.
  3. Alternatively, sprout the beans after soaking them (keeping them in a well-ventilated bundle at room temperature for about 36 hours, and misting or wetting them when they dry out.)
  4. Heat the oil in a pressure cooker (alternatively a conventional pot such as an enameled Dutch oven) on medium heat.
  5. Once the oil is hot, add the cumin seeds and let them sizzle.
  6. Add the onion and green chili plus a little salt. Sauté until the onions get translucent.
  7. Mix in the tomatoes; add all the dry spices and remaining salt. Sauté for a minute.
  8. Add drained beans and the water. Cover the pressure cooker and let it whistle 5-6 times on medium heat. (Alternatively, boil in a Dutch oven for about an hour.)
  9. Turn off the stove and let the pressure reduce by itself.
  10. Open the lid, add lemon juice and cilantro.
  11. Mix well and serve (e.g., on white rice).

Moth beans.jpg

A pot of moth beans (recipe quadrupled–you can never have too much of these!)

New England Baked Beans

I realized that July is “National Baked Bean Month” in the United States, which is both amusing, and a call to action! I like beans in general and baked beans in particular, but I don’t prepare them nearly as often as I should. Below I include a recipe from the American Dry Bean Council; I’ll prepare it as soon as I get back home from a conference this week.

See pulses.org for more great bean ideas and recipes. Additionally, 2016 is the International Year of Pulses!)

Ingredients

  • Navy beans (dry): 1 pound (can replace with 4 cans of beans)
  • Bacon, cubed: 8 ounces
  • Onions, chopped: 2 cups
  • Garlic, minced: 2 teaspoons
  • Molasses, unsulphured: 1/3 cup
  • Light brown sugar, packed: 1/3 cup
  • Mustard, prepared: 2 teaspoons
  • Mustard, dry: 1/2 teaspoon
  • Allspice, ground: 1/4 teaspoon
  • Bay leaves: 2
  • Salt: 2 teaspoons
  • Pepper: 1 teaspoon

Procedure

  1. Place beans in large saucepan with enough water to cover by 2 inches; heat to boiling and boil 2 minutes. Let stand, covered, 1 hour; drain.
  2. Return beans to pan with enough water to come to the top of the beans; heat to boiling. Reduce heat and simmer, covered, until tender but not soft, 30 to 40 minutes.
  3. Preheat oven at 250 degrees.
  4. Transfer beans and liquid into large pot or 3 quart casserole.
  5. Stir bacon and remaining ingredients into beans.
  6. Bake, covered, for 1 hour. (1/2 hour if using canned beans.)
  7. Uncover and bake until desired thickness, 4 – 6 hours, stirring every hour.

Cornbread using self-rising cornmeal

I live in Murray, Kentucky, and I’m very interested in foodways. Needless to say, when I ran into the book A Culinary History of Kentucky: Burgoo, Beer Cheese and Goetta at the Golden Pond Visitor Center in nearby lovely Land Between the Lakes, I snapped it up.

The book mentions Weisenberger Mills (near Lexington) as a company that makes the best grits in Kentucky. I love grits, so I bought some from Weisenberger’s online store; I also bought some self-rising cornmeal mix to experiment with. They are both delicious! I reproduce the corresponding cornbread recipe (the original is HERE) below for your inspiration (and my own convenience).

Ingredients

  • Self-Rising Cornmeal Mix: 1 3/4  Cups
  • Sugar: 1 teaspoon (omit if using sweet milk)
  • Egg: 1
  • Buttermilk: 1 ½ Cups (can replace with sweet milk, see sugar above)

Procedure

  1. Preheat muffin or stick pans while preheating oven to 500 degrees F (260 C).
  2. Mix dry ingredients then add beaten egg.
  3. Pour in buttermilk, mix.
  4. Fill pans after a generous greasing.
  5. Bake 15 minutes at 500 deg. F (260 C) oven.

Steamed Dhokla

From: NDTV.COM (Correct amounts). Written instructions from another NDTV page (Incorrect amounts). Authors: Aditya Bal & Devanshi
Servings: 2
Time: 5-10 minutes prep time, about 30 minutes cook time.

Ingredients, Dhokla (Correct amounts)

  • 1 cup besan (chickpea flour )
  • 1 tsp citric acid
  • 1+ tsp sugar
  • Salt to taste
  • Pinch of turmeric
  • Water
  • 1 tsp fruit salt or baking powder, dissolved in water

Ingredients, Tadka (Correct amounts)

  • 1 Tbsp oil
  • 1/2 Tbsp mustard seeds
  • Red chilies
  • 7-8 curry leaves

Method

  • In a bowl mix the besan, citric acid, salt, sugar and turmeric. Add water and make it into a smooth batter with medium-thick consistency.
  • Grease a steaming tin with a little oil
  • In a glass mix the fruit salt or baking powder with some water. Incorporate this quickly into the dhokla mixture.
  •  Pout the mixture into the steaming tin. Steam for about 15-25 minutes or until cooked (Time needed depends on depth of the pan.)
  • Heat the oil in a skillet. Add the mustard seeds, curry leaves and red chilies. Let them pop and cook until the flavors are released.
  • Pour the tadka over the prepared dhokla.
  • Cut into pieces and serve.

Notes

  • The proportions shown in the original webpage are way off: I made a batch with those proportions and it was off-the-charts tart, the result of adding a TABLESPOON of citric acid to a cup of chickpea flour! The video has better proportions.
  • Someday I’ll try a fermented version without the citric acid + fruit salt chemistry.
  • The dhoklas went great with a tamarind chutney.

20160507 Dhokla.jpg

Not a very glamorous shot, but it does look better when cubed!

Besan Khandvi

From: Aadhar Restaurant, Ahmedabad (Presented HERE)
Servings: 4
Cook time: 30

Ingredients, khandvis:

  • 1 cup besan (chickpea flour)
  • 3 Tbsp curd (yogurt)
  • Salt, to taste
  • 1 tsp turmeric
  • 1 tsp red chili powder
  • Hing (asafoetida), a pinch
  • 3 cups water
  • Oil, to grease

Ingredients, tempering:

  • 2 tsp oil
  • 1 tsp mustard seeds
  • 2 tsp sesame seeds
  • 2 chopped green chilies
  • 2 Tbsp water
  • Coriander leaves, to garnish
  • Red chili powder, to garnish

Procedure, khandvis:

  • In a kadhai or wok mix together besan, curd, salt, turmeric, hing, red chilli powder.
  • Add 3 cups water gradually to make a batter.
  • Now turn on the heat (medium flame) and start stirring the batter continuously.
  • Once the batter reaches a thick consistency, turn off the heat.
  • Grease the back side of the plates with a little oil and spread the thickened batter. (Make sure the batter applied is not too thick or the khandvis won’t roll.)
  • Let them cool for 10 minutes.
  • Cut strips with a knife and roll.

Procedure, tempering:

  • In a small pan add oil, mustard seeds, sesame seeds, chillies and water.
  • Pour over the  khandvi
  • Garnish with coriander leaves and red chill powder.

Working on PAIL

I spent April 12-14 in St Louis working with Dan Berne, the project manager of AgGateway’s PAIL project. Our goal was to make progress on organizing the PAIL project’s materials leading up to presenting an irrigation data exchange draft standard. We put a lot of energy into it and made great progress; there seems to be light at the end of the tunnel!

From the housekeeping, rock-pounding point of view, we focused on stringing multiple pages of materials together so we could have different, individually-editable pages of content (divide and conquer!), strung together in a “master” page where we could read the whole thing and find places where it did not flow right. This was pretty easy to do using the “Include page” macro in the wiki AgGateway uses for collaborative content creation. (Confluence, by Atlassian: a very powerful tool!)

From the point of view of the actual draft standard’s content, we focused on documenting the somewhat-hard-to-grasp concept of Reference Data, and the different kinds of Setup Data, as introduced in the Core Documents flyer the SPADE Communications Team came up with a few weeks ago. Describing different Setup Data use cases is particularly important: if you’re pulling, say, (from an API, for example) a year of data collected from a device under a certain configuration, and the configuration changes halfway, there are multiple ways of messing that up, orphaning data and confusing the user. Many of the field operations data-collection systems currently out there don’t handle this situation very gracefully, so a clear set of implementation guidelines is a valuable asset to the industry.

Below, a first crack at a simple explanation of the difference between Reference and Setup data; I’ll be looking to refine this and make it less wordy.

4-21-2016 7-51-10 PM.png

On another note, it’s interesting just how much work goes into drafting a data exchange standard (starting from figuring out what existing standards you can draw from), and how few people ultimately show up to do the initial dirty work. Standards are critically important for making rational use of resources, but we’re not taught to appreciate their value; it’s increasingly difficult for organizations to allocate the resources necessary to make this happen. Starting right here, right now, in my own little “man in the mirror” sort of way, I think I’ll reach out to the local college to give a few talks on the value of standards in ag technology and try to awaken awareness in some future professionals. #babysteps

PAIL-intensive week ahead!

Tomorrow I’ll be traveling to St. Louis (Missouri) to meet for 2-3 days with Dan Berne, the talented (and infinitely patient) project manager of AgGateway‘s PAIL project. (See a flyer HERE.)

Our plan: to make major progress on the draft of a 3-part standard on irrigation data exchange the PAIL team has been working on since 2013. It’s time to wrap up that work and submit it to ASABE, to get it in the hands of a bigger audience!

(By the way, Dan also writes novels; I loved his book The Gods of Second Chances!)